Monday, June 27, 2011

Simplicity 2207 Steampunk Gown

I wanted to make something kind of theatrical to wear to my book signings to really put the audience in a spooky mood.  Ideally, I would like to have made a late Victorian mourning outfit for that.  Unfortunately, in order to do that up right, I would not only have to make the base gown, I would have to have all the proper underpinnings for it.  Realistically, I don't have enough free time to have all that finished by mid-August, so I went with Plan B - Simplicity's 2207, a lovely Steampunk outfit with a very late 1880s/early 1890s feel to it.


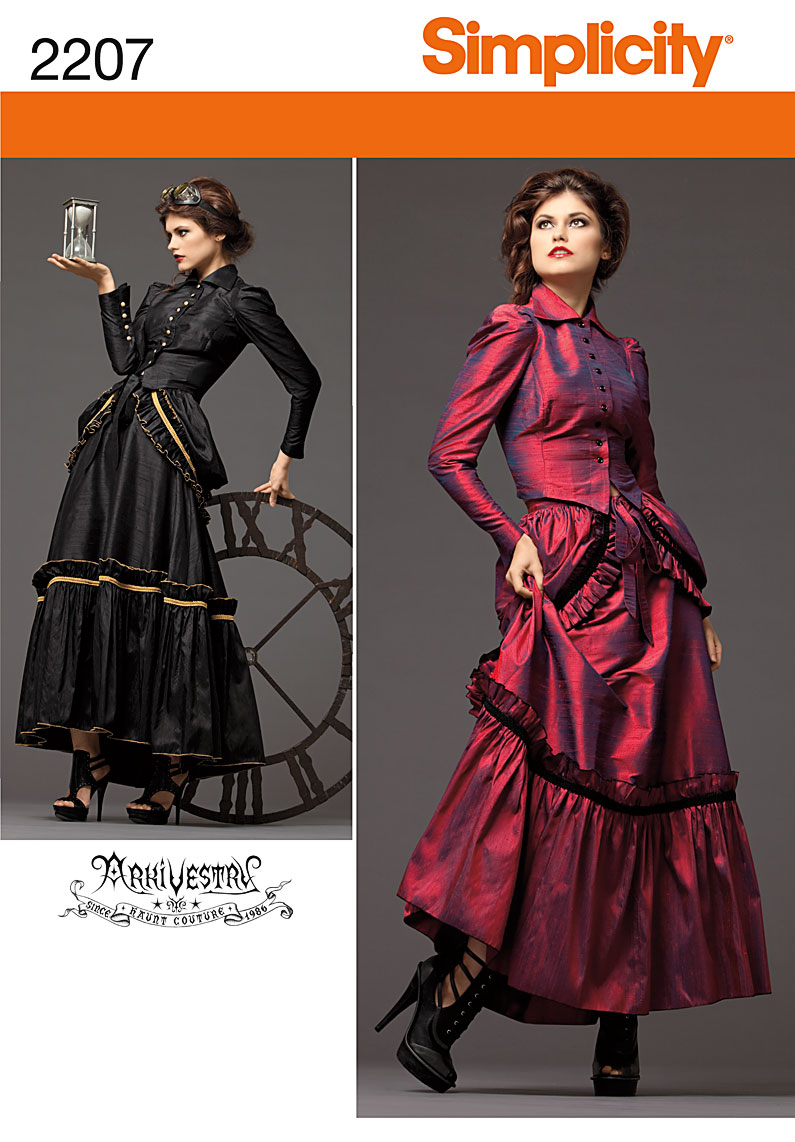
I am making it in black acetate taffeta and purple velvet ribbon for the trim.  I appreciated the fact that the skirt has an elasticized waistband in the back, as my waist size has been in a state of flux for the past year.  I didn't pay attention to the pattern instructions and ordered 3/8 inch ribbon for it.  In hindsight, that will not show up as much as it does in the illustration.  Since my color scheme is more muted, it may not make as much of a difference.  I also ordered vintage black glass buttons for it.  I was toying with the idea of using some clock faced buttons I have in my stash, but for my purposes, it's probably better to stick with a faux Victorian look than go full out Steampunk.

I have just started making it and already have an observation.  The flounces and ruffles are designed to be finished using a serger or zig zag stitch.  Since most of what I sew is historically correct reproduction clothing, I never bothered getting a serger.  It would have come in handy big time for this.  I zig zagged the edged once on the #6 width, which on the lightweight taffeta, ended up being more like a #2 width.  I had to go over it a second time to make the color noticeable and to make the finished edge more secure.  The single row of zig zagging felt like it could easily get pulled loose.  Fair warning, you will need a lot of the contrast thread for this.  I expect to go through 2 large spools, possibly more.  I'm going to have to hand trim all the fuzzy edges off of it, too.

Come to think of it, I am in the mood for this general style, having watched the full series of Lark Rise to Candleford recently.  The costuming in that was charming.  The photo below doesn't do the costuming in general justice.


IF I have time, I will be making a late 1880s/early 1990s bonnet to go with it.  I found the perfect pattern offered by Lynn McMasters.  She has some very cool bonnet and hat patterns in general.  If I enjoyed making hats (which I don't), I could have a field day with these.


And if I get really energetic, I would like to make the late 1880s coat from Truly Victorian.  One of the characters in Lark Rise wore something similar to this made out of cotton velvet.  It was worn over a bustle-less skirt, and the extra length included to cover a bustle draped quite prettily in the back.

Wednesday, January 26, 2011

1910 Hat Pattern

After all that searching last summer for a 1912 appropriate hat pattern, it turns out that a friend of mine sells them on her website at Eva Dress.  D'oh!  Well, now I've got the pattern in hand for any future needs.

I have had to slow down on blogging here because I have had very limited time to sew for the past year.  That's actually for positive reasons.  The History Press out of the blue contacted me to write a book about my other love, local ghost stories, and the history behind them.  Look for The Haunted History of Columbus, Ohio to be out in bookstores at the end of summer, 2011.

As soon as it is finished and shipped off to the publisher, you can bet that I will be back to my sewing machine in a heartbeat.  This actually gives me an excuse to make more vintage clothes.  I will have to go to dozens of book signings next fall for it.  What better way to dress for that sort of thing than to wear historically correct mourning clothes from decades past?  I would love to make an Edward Gorey style mourning outfit.

Thursday, December 2, 2010

Old Fashioned Christmas in Columbus, Ohio

In the mood for an old fashioned holiday?  It may be 2010 but there's no reason why you can't travel back in time to experience Christmas 19th century style. The local house museums are all gussied up and ready for visitors.

At the Kelton House Museum and Garden, you can see a fabulous display of Victorian and early 20th century Christmas decorations from the collections of Michael Girard.  Open hours are Sunday afternoons from 1 - 4 p.m. They are also holding special tours for the month of December on Fridays from noon to 2 p.m.  The tours last about an hour, so make sure to get there early.  Admission is $6 and under.   

You are probably familiar with the song "Up on a Rooftop," but did you know that it was written by a composer in Westerville?  Come visit the Hanby House, home of Benjamin Hanby, for a dose of Christmas cheer.  They are holding a holiday open house on Saturday, December 4 and Tuesday, December 7 from 7-9 p.m., and Saturday, December 11 and Sunday, December 12 from 1-4:30 p.m.  Admission is $3 and under, or free to members of the Hanby House or Ohio Historical Society. 

If you are in the mood for something earlier, the Orange Johnson House in Worthington harks back to pioneer days.  They are also having a Christmas Open House on 3 Sundays, December 5th, 12th, and 18th from 1 - 5 pm.  There will be musical performances at 1:30 and 3:30 pm.  Admission is free.

A perennial favorite is the Ohio Historical Society's Dickens of a Christmas event at Ohio Village.  The entire village is decorated in mid-Victorian style, with wandering carolers and costumed interpreters giving demonstrations in the buildings.  This is the most interactive of the festivities, with hands on activities for both children and adults.  The dates are December 10, 11, 17, 18 from 6-9 p.m.  and on December 19 from noon-5 p.m.  Admission is $12 and under.

Please click on the links for more details, and have a wonderful holiday season!

Wednesday, July 21, 2010

The One Hour Dress from 1924

The One Hour Dress (center) and 2 vintage pieces

I needed a dress for a 1920's lawn party but didn't have a whole lot of time to put into it.  I found the perfect solution in the One Hour Dress.  That is a set of instructions created by famed home economics instructor Mary Brooks Picken in 1924 for making a dress in an unbelievable amount of time.  There is a set of videos on YouTube where a seamstress demonstrates this, and yes, you really can make a dress in an hour.  However, it requires techniques like not using pins or finishing the seams that I was not comfortable with.  So, between using the usual sewing techniques and making some modifications to the pattern, it took me more like 4 hours to make.  I met a lady at the lawn party wearing a fancier variation of the dress.  She said it took her an entire week to make.  You can easily spend much more time on it the more detailed you decide to make it.

I have to admit, I really liked being able to make a dress without using a pattern.  Or maybe I just like being able to work on something without the cats dive bombing the pattern and chewing on it while I'm trying to pin it down and cut it out.  The modifications I made were to change the skirt so that it overlaps in front and adding a wide bias cut strip at hip level for interest.  Depending on the fabric choice and trimming, the pattern can end up looking like a hospital gown.  The hip detailing was a good decision in terms of making it look more dresslike.

The end result turned out really well.  It does have a very period look, as of course it should.  Sadly, I only came in second place in the costume contest with it.  The costume that won was a cheesy all over fringe dress worn with a feather boa and a pair of flip flops!  At least I don't have to worry that I didn't win because my dress didn't look authentic enough.

Sunday, June 27, 2010

The 1912 Kimono Dress Completed

Here is the end result of my Sense and Sensibility 1912 Kimono Dress.  Overall, I liked the pattern.  My only issue with it is that the bodice and skirt parts in the back required some easing to fit together.  The cotton broadcloth I was using didn't work too well for that and puffed out a bit.  I also wish that I had either been able to afford the same print that I used for the bodice for the underskirt, or used the underskirt material for the belt to tie it all together better.  Still, the end effect is very pretty.  I got a lot of compliments on it.

Getting a proper hat for the era was a bit of a challenge.  The closest I could find patternwise is the hat pattern from Simplicity's Edwardian duster coat pattern.  The crown on that really wasn't wide and deep enough for a 1912 impression.  I probably could have altered it easily enough, but I really didn't have the time to spend making a hat regardless.  So, after doing some research, I found that a smaller brimmed hat would also be appropriate as long as the crown was fairly deep and wide and the trim was even higher.  I found a nice modern one and some great 4" wide ribbon on eBay.  The Ribbon Store out of Las Vegas is a godsend for historical hat making!    I made a cockade based on the Old Fashioned Ribbon Art book that Dover republished. (Update- hat problem solved!)

I'm pretty pleased with the outfit.

Tuesday, April 20, 2010

1912 Kimono Dress

I had to take my sewing machine in to be fixed. The sewing machine repairman was swamped, so it took 3 1/2 weeks to get my machine back instead of the 3 days that it normally takes. It's nice to see someone getting a lot of business in this economy, but that threw me off schedule. I had to put the 1863 jacket on the back burner and switch to working on another project that I have a deadline on.

The new project is the 1912 Kimono Dress pattern put out by Sense and Sensibility that I am making for a historical presentation in June. I won't take me that long, but since time has a way of getting away from me, I thought it would be smart to get it taken care of. However, this pattern is making up so fast that it almost counts as an instant gratification project. I got it cut out a couple of days ago and should have no problem getting it finished in an afternoon.

One thing to watch out for if you decide to make this pattern - the bodice pattern is designed for 54" - 60" fabric. If they mentioned that in the yardage requirements, I completely missed it. However, that may have only been an issue for me since I made the bodice out of a different fabric than the underskirt.  I may have been able to lay the pattern lengthwise instead of crosswise that way.  Luckily, I was using one of the smaller sizes, so the fact that I was using 45" material only resulted in the sleeves being 3/8" short. Anyone trying to make one of the larger sizes would have a problem, and with medium sizes, the sleeves will be short. There is an option to add contrasting cuff sleeves which could hide some of the shortness.

I think this will turn out nice. I found some era appropriate reproduction fabric from Fabric.com for the bodice in pink and green for the bodice and sash. The rest is broadcloth in coordinating colors. Of course, I will post pictures when I'm done.

Hopefully, I will be able to get back to the 1863 jacket soon. The French blue cotton velvet I got for it is gorgeous, and I found some lovely old gold trim to go with it. Unfortunately, I have 2 other 1920's costume events in June that I also have to get ready for, so it may be on the back burner for a little while longer. Now I remember why I tend to use all my vacation time to hang around the house and do sewing.

Want to see the finished project?  Here's how it turned out.


copyright Nellie Kampmann, 2010

Sunday, March 14, 2010

1863 Jacket Progress

The pattern arrived yesterday, so I went ahead and made the mockup. I was surprised that the pieces all fit together just fine, aside from requiring some easing, as described in the pattern instructions. From what I'd heard of patterns from that time period, they tended to be wildly inaccurate, and were mainly used by seamstresses as a general guide. The patterns are not detailed. They are basically "sew pattern piece A to pattern piece B". The basic construction is pretty simple, so that's not a huge issue. However, there is no mention of, oh BTW, you need to make a lining for this and things like that. An experienced seamstress should have no problem figuring out how to make it, but I would not suggest it for someone who is fairly new to sewing.

It fit me (34" bustline) quite well. It will require 2 yards of outer fabric, with or without nap, and 1 7/8 yards of lining.

Now what to make it in? I was originally thinking of cotton velvet in a color to coordinate with my day dresses. the sleeves will not accommodate the bulk of my day dress sleeves. After doing more research, it looks like jackets of this kind were not meant to go over other dresses anyway. The illustrations inevitably show them over a blouse, sometimes with a vest, and a skirt that is usually made of the same material. The original May 1863 instructions suggest making it out of cashmere,silk, or wool.

Here is an illustration from 1865 showing various jackets. It is from La Couturière Parisienne, one of the best sites I have found for researching high fashion from previous centuries. She has everything from paintings and fashion plates to actual patterns available there. This illustration is a couple of years beyond what I'm shooting for, but it fits with the other research I have done on this.


So, in addition to the usual dithering I have over color, I have to decide whether to make it in a heavier contrasting fabric, possibly to donate to the museum where I work weekends for the docents to wear. That would need to be easily cleaned, which limits my fabric and trim choices. Option 2 is to make it from silk and make a matching skirt. That would also require making a blouse. All that would be a much larger project that I had originally intended for this. Option 3 is to make it to wear to my day job at a archives library, which gives me more color choices, but would again limit the choices of fabric and trim. I'm leaning towards combining Options 1 & 3, making it for work, but also keeping in mind that I could use it with the costumes at the museum.